Mig welding was developed in the 1940’s and till now the principle is still the same. It uses an arc of electricity to create a short circuit that continuously fed anode and cathode. The heat which is produced by the short circuit, in combination with the non-reactive gas begins to melt the metal and allow them to mix together. After it cools down, the heat begins to remove and the metal solidifies. And hence a new piece of metal is created.
Its full name many years ago was Metal Inert gas (MIG) was changed to Gas Metal Arc Welding (GMAW) but people still call it MIG Welding. It can be used to weld different types of metals such as carbon steel, stainless steel, aluminum, magnesium, and other alloys.
Introduction to MIG welding
Mig welding also is known as GMAW which is a really popular type of welding that is mostly used to weld low alloy steels, and very suitable for welding autobody parts.
It is an efficient process that uses electricity to melt and join pieces of metals together. Sometimes, it is also referred to as a hot glue gun of the welding world and regarded as one of the easy types to weld.
The process of MIG welding
This process is an arc welding process that is used to join metals together by heating at a very high temperature by the aid of arc formed between a wire electrode and a workpiece. The wire electrode is given to a mig gun and is consumed into the molten weld. Also, a shielding gas is released by the gun to protect the arc and puddle from being contaminated by the atmosphere.
Working of Machine
Welder
In the welder, there is a spool of wire and roller sets that pushes the wire out of the gun. The spook of wire is held with a nut. It should be moderately tight so that neither it is too tight nor too loose. The wire inside the welder goes into the set of rollers that pulls the wire from the big roll. It has aluminum wire loaded into it.
Shielding gas
For the workpiece, not to be contaminated with the impurities in the air. Shielding gas is used. This gas is either 100% of CO2 or Argon. Without the gas, there will be brown, splattered and it will not look good. Open the main valve of the tank. The reading of the gauge will be between 0 and 2500 PSI. It should also depend upon the type of work you are doing.
Welding gun
The welding gun is the most important part of your work. The gin comprises a trigger that controls the wire feed and the electricity flow. It is guided by the copper tip. The size of the tip varies for the machine to machine. This part is mostly already be set up. The outer cover is covered by a ceramic to protect the electrodes and to directs the flow.
The Ground Clamp
It is the cathode (negative terminal) in the circuit which completes the circuit. It should be clipped directly into the piece of metal or on a table. The clip must be in good contact with the workpiece which is being welded. Make sure to grind any rust or paint to make it work properly.
Before the start of your welding, make sure things are properly setup.
Welder
Make sure that the shielding gas valve is open and that the flow of gas is 20ft3/hr flowing through the regulator. It needs to be on, and the grounding clamp is attached to your welding piece or maybe a table.
Metal
If you just take a MIG welder, the metal and start welding, it will not give you a good result. So, if you need good results, take 5 minutes to clean your metal and make sure to grind edges.
Practicing/Laying your bead
Once the setup is all done, now its time to do a little bit of practice before the actual work.
You should practice a little bit before joining two pieces together. Do this for a couple of times, to have a grip on it. Every welder has its own setting. So, you need to check it before use. If it is producing splattered weld, then the power is too little or if it is creating a hole, so it is too high.
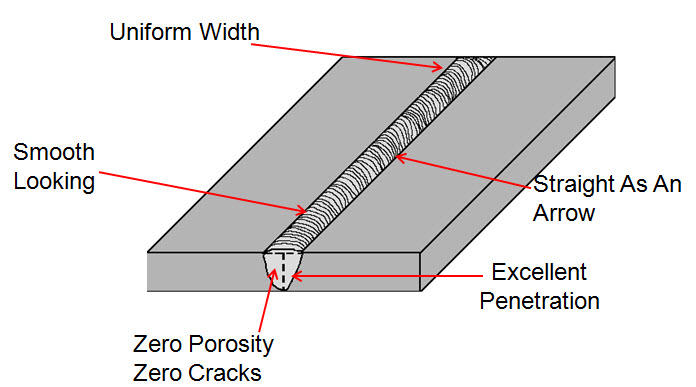
The process of laying a bead is not too difficult. You are just supposed to make a small zig-zag pattern or may be little concentric circles moving. Always, start laying beads in an area of one or two-inch and then move to another area so that the workpiece doesn’t get much hot or to not create a hole. So, better to lay beads in one spot and move to another and then come back once it gets cool down. The right setting will be when your weld starts looking smooth and nice.
Start welding
Once the laying beads method is completely done and you’ve got a grip on welding. So, here begins the actual process of welding.
We will only take the welder and making our sewing motion to the top of the seam. It is best to weld from the bottom, pushing the weld tip to the top of the metal. But in the beginning, if it is bothering you, then it is perfectly best for you to start welding in any direction.
After the welding is done, the surface is left with a big bump where the filler will come out. It’s your choice to leave it as it is, or maybe grind it flat.
Grind down the weld
If your weld is on a piece of metal, then it will leave big bumps on the surface which will not look good and professional, and you also want to make it nice, then you should grind down the extra welds.
For this, you will need a grinder and start grinding on the weld. Be careful of the fact, as you approach the surface, you don’t want to grind the piece of weld that you just have done. Move the grinder with the normal force not to hard or not too low. If you see blue tingles coming out of the surface, then you are pushing it too hard or not moving the grinder very well.
Common Problems while welding
It is possible that you have some problems related to your welding. Some of the problems are
- Not enough shielding gas is provided to make sure that the surface is not contaminated.
- Welds are not passing through the surface. It will be easy to tell as your weld will be weak and won’t be fully joining the pieces.
- Welds will burn right through your material. The reason for this is the excess use of powder. If you want to remove it simply turn down your voltage.
- There will be too much metal in the pool or the weld is not perfect. This can be caused by too much wire coming out of the gun and can be fixed by slowing the speed of wire.
Benefits of MIG Welding
- Productivity
The best feature of MIG welding is that it can increase productivity and can reduce the time of cleaning. You can double your time by not changing the rods, brushing the welds, and clean the slag. - Reduced Costs
A high-quality welder can be purchased under $500, and after that, there is just a need to purchase wires and gas. The increase in productivity will allow you to complete more tasks in less time. - Easy to Learn & Setup
The reason why MIG is very popular these days is that anyone can learn it very quickly. It is a good choice for hobby welders and who wants to run their own small business. You can start your business by just buying MIG welder and with just basic learning, you will be able to start welding.
4. Good Quality
It uses a shielding gas to protect the workpiece to be contaminated. It results in a good weld because you don’t have to remove slag every now and then. Also, the wire feed and the setting for voltage allows you to increase versatility.Tips for staying safe while welding
Necessary precautions should always be taken while doing any sort of work for safety purposes. If we talk about welding, this process includes a lot of heat, pressure, toxic fumes, light radiations, and harmful dust particles.
You must understand the process and precautions of the welding before starting it, as lack or negligence of any sort can cause huge consequences.
-
Thorough understanding of the manual
It is very important for a person to understand the complete procedure of work before starting it. Manual includes all the safety instructions and procedures to operate the machine.
-
Wear protective gears
Proper dressing is always very necessary during the welding process. Always wear proper welding boots, helmets, gloves, jackets, flame resistance suits, and respirators. Welding boots are tough and shockproof they are designed to withstand the heat and shocks caused by electric current during welding and also protects your feet from any sort of metal piece and injury
In short, you have to fully dress up for this critical job.
-
Safe workplace
Always weld in an open airy place or a place with good ventilation. Remove any extra tools or clutter around the area. Remove any matchbox, lighter, or fire catching instruments.
-
Avoid electric shocks
A lot of heat and energy is involved in the welding process and metals are usually the great conductors of electricity and so are humans. If you don’t take safety measures your chances of getting an electric shock are very high.
Try to properly insulate yourself. Always work on dry ground and make your surrounding dry and clear there should not be any conductive material.
-
Avoid Fire
While welding, there are many chances of fire. It is one of the dangerous aspects of welding because the heat involved or generated in the process of welding is enough to ignite the fire in nearby areas. The chances of fire on metal are very less because it is inflammable but the surrounding should be dealt with care.
It is necessary to keep a fire extinguisher near the welding place or fire buckets in case a fire breaks out, as it can spread very rapidly once it is started. Also, it is important to know that a fire does not start immediately but it is a slow process but you need to be aware of your surroundings in order to make sure that there is no fire.
-
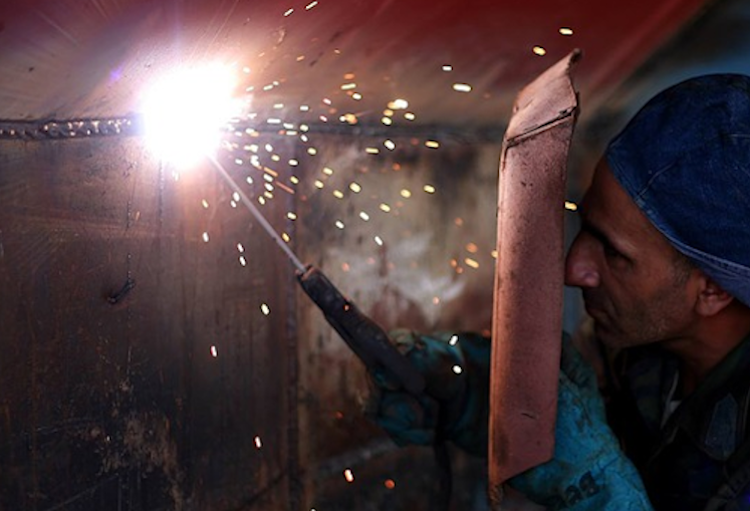
Don’t see the light
Only a second is needed to let the welding arc be exposed to the human eye which can experience arc flash and cause painful conditions that cannot be detectable until hours after the exposure. Till that time, it can cause many serious damages to your eye.
So, in order to be protected from the exposure of arc flash while welding, helmets should be used that comes with the proper fitting of shades to protect the eyes and face of the worker. Also, the protective glasses can be worn underneath the helmets
-
Breathe freely
While welding, there are some hazardous and polluted fumes and smoke. These smokes or fumes are very harmful to you if you inhale them for a long time while working in a tight, confined space.
These fumes may accumulate in front of you and can block the way of breathable oxygen, thus causing hindrance to you for breathing. Always use an exhaust room for the removal of fumes from the area and to make sure of the clean breathing.
-
Use the right welding set up
Always use the right welding set up to be safe from the repercussions. Setting the right setup for welding is another main and safety point that every welder will think of it. An experienced and wise welder will always choose the right posture and position and avoid crouching.
Always use turntables and any other devices to move the workpiece and make sure to keep the fumes away from your face. Also, use special kind of electrodes that makes fewer fumes.
-
Avoid excessive currents and long welding
High currents and long arcs can increase the probability of undercut. Undercut usually happens by the wrong technique of welding, wrong electrode handling, and not correct travel speed.
So, never make a hurry in welding because it will be more dangerous and you should take your time to finish the work accurately and smoothly.
-
Use of earmuffs or earplugs
The use of earmuffs or earplugs protects your hearing abilities from the excess of outside noise of welding. They also protect the pieces of metal from going into your ear canal. So, the need for earplugs or earmuffs is necessary for them to maintain their good physical and hearing ability.